I spent a while tonight trying to figure out what the HELL I did to get that cool almost no color photo of Zach in yesterday's post...this one:

I have a trial version of Adobe Photoshop CS3 and my own Adobe Photoshop Elements 3.0. I was messing with both of them yesterday, and I couldn't remember exactly what I did to it. I couldn't replicate it with CS3, mainly because I couldn't find a "remove color" button...
So. I opened Elements and WOO!

50% (I will explain 50% of what in a minute...)

70%

90%
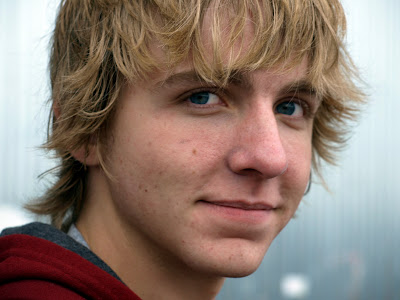
Here is the original photo, or the photo I started with -- I usually hit at least the auto contrast and bump up the saturation just slightly using Picasa2 (the free photomessing program from Google). I may have also used the glow button on Picasa2. I mess with my photos quite a bit.

Here's what I did. It's pretty dang easy, actually...
Open the photo you want to play with in Photoshop Elements. Then create a duplicate layer:
From the Layer menu in the tool bar, choose New and then Layer via Copy (or just hit Ctrl + J). You will then have two layers in the layer box -- layer 1 and background. For this next part you need to work with just Layer 1. So click the little eye icon next to the background layer so it (the little eye icon) disappears. (I hope you are following me so far...)
Now open the Enhance menu in the toolbar, then Adjust Color then Remove Color. Your picture should turn black and white. Now in the Layers box, change the Opacity slider. The higher the percentage the less color there will be in your finished photo. Like above -- 50% has more hint of color than 90%. 100% will be black and white.
(I prefer Picasa2 for turning my photos into black and white shots because I can easily choose the color filter, which makes a difference in the finished black and white shades and textures. Picasa2 is more basic that Photoshop, but way fun and very user friendly. And free!)
Enough commercial! Now that you have adjusted the opacity, you have a black and white photo with a checkerboard over it...click on the eye icon box so you are looking at both layers again and you have a black and white photo with a hint of color. If you want to adjust the amount of color, you have to click the eye icon next to background so you are only working with Layer 1.
I use the Save As from the File menu, and save it as a JPG file with a different name so I have the original photo and the hint of color photo.
I hope this makes sense. I assume a certain familiarity with Photoshop Elements, but if you want more details let me know...
You should go do contests at Worth. We've entered a few. They are so much fun. Also, they have some kick-ass tutorials that can teach you almost anything. I think I have a link on my site or else it is just worth1000.com
ReplyDeleteI have never really played with Photoshop. Looks like I need to start. I've saved your lesson for whenever I get it. Very nice!
ReplyDeleteThanks so much for including step-by-step instructions! I would have spent oh so much time trying to re-create that effect ;)
ReplyDelete